Google की हार्डवेयर टीम के पास ऐसे उपयोगकर्ता हैं जो किसी चीज़ की प्रतीक्षा कर रहे हैं। पिछले कुछ वर्षों में, हार्डवेयर टीम ने नए और उल्लेखनीय नवाचारों के साथ कंपनी की पहुंच का विस्तार करने के लिए लगातार प्रयास करना जारी रखा है। ईयरबड्स, स्मार्ट होम, फोन और यहां तक कि ज़िप्पी नोटबुक के क्षेत्र में नवाचार के खुलासे के साथ, इसकी महत्वाकांक्षाएं लगातार बढ़ रही हैं। रिपोर्ट्स के मुताबिक, नए साल तक लॉन्च करने की योजना के साथ, Google अपने स्मार्ट डिवाइस कलेक्शन में एक स्मार्टवॉच को जोड़ने पर विचार कर रहा है।
अब तक Google का प्राथमिक ध्यान हमेशा स्मार्टवॉच के सॉफ़्टवेयर पक्ष पर रहा है। Google ने वेयर ओएस जैसी विकासशील तकनीक के साथ भागीदारी दर्ज की है और तीसरे पक्ष के घड़ी बनाने वालों को इसके आसपास अपना हार्डवेयर बनाने की क्षमता प्रदान की है। हालांकि, कुछ ही समय में, Google बहुत ही पहनने योग्य निर्माताओं जैसे सैमसंग के साथ प्रतिस्पर्धा में हो सकता है, जिसका उसने समर्थन किया है और इतने सालों से उसके साथ बहुत अच्छी साझेदारी है।
वेयर ओएस के लिए इसके समर्थन के बावजूद, Google ने कथित तौर पर अपने डिवाइस को आंतरिक रूप से "रोहन" कोडनेम देने के लिए आगे बढ़े हैं, रिपोर्ट कहती है कि शायद इसका अंतिम उपनाम नहीं होगा। अटकलों की सबसे अधिक संभावना है कि नए डिवाइस को "पिक्सेल वॉच" या "पिक्सेल वियर" जैसे नाम मिल सकते हैं, जब यह शिप करना शुरू करता है, तो पारंपरिक नाम Google ने आज तक नियोजित किए हैं।
स्मार्ट डिवाइस के डिज़ाइन के लिए, समाचार सूत्रों का कहना है कि यह सबसे अधिक संभावना है कि घड़ी का चेहरा गोल हो और शायद बेजल-मुक्त भी हो। अभी के लिए, यह बताना काफी मुश्किल है कि स्मार्टवॉच किस डिज़ाइन के साथ-साथ व्यवहार में और साथ ही घड़ी के स्थायित्व के रूप में सामने आएगी। एक उल्लेखनीय अपवाद के रूप में Apple वॉच के साथ कई स्मार्टवॉच को गोल चेहरों के साथ भेज दिया गया है, इसलिए हम Google स्मार्टवॉच के आकार से बिल्कुल आश्चर्यचकित नहीं होंगे।
हालाँकि, बिजनेस इनसाइडर द्वारा देखे गए एक डिज़ाइन किए गए दस्तावेज़ के अनुसार, Google का उद्देश्य एक ऐसी स्मार्टवॉच विकसित करना है जो कम से कम "90% आबादी" के लिए आरामदायक हो, यह आराम का मुद्दा Google के लिए इतना महत्वपूर्ण है क्योंकि यह दृढ़ता से महसूस करता है कि "अपर्याप्त" है साइज़िंग" समस्या जो कुछ उपयोगकर्ताओं को "पूरी तरह से पहनने योग्य" का उपयोग करने से रोकती है। एक बड़ी कलाई वाला स्मार्टवॉच उपयोगकर्ता अंततः Google के साथ तहे दिल से सहमत होता है। उपयोगकर्ता बताता है कि कैसे उसने पुराने फिटबिट मॉडल पहनने की कोशिश की है, जबकि शिकायत करते हुए कि वे हमेशा थोड़े बहुत तंग थे या बस मेरे अनुपात के लिए अच्छी तरह से आकार में नहीं थे।
कार्यक्षमता के संदर्भ में, रिपोर्टों का कहना है कि स्मार्टवॉच स्वास्थ्य और फिटनेस ट्रैकिंग सुविधाओं को पेश करेगी जैसा कि हमने Google के जल्द से जल्द प्रतियोगियों द्वारा अधिकांश स्मार्टवॉच में देखा है। हालांकि रिपोर्टों में कहा गया है कि कर्मचारियों को कथित तौर पर दर्द बिंदुओं और संभावित क्षेत्रों को निर्धारित करने के लिए डिवाइस का परीक्षण करने की अनुमति दी गई है, जिनमें तकनीकी दिग्गजों को सुधार करने की आवश्यकता है। हालांकि, दो प्रमुख उपभेदों का उभरना जारी है। ये दो स्ट्रेन घड़ी की चार्जिंग की धीमी दर और इसे लगातार चार्ज करने की आवश्यकता है। स्मार्ट उपकरणों, विशेष रूप से स्मार्टवॉच के लिए बैटरी लाइफ कितनी लंबी है, इसके महत्व को देखते हुए, यह एक बड़ा झटका और आश्चर्य होगा यदि डिवाइस उस राज्य में जहाज करता है। ऐसा माना जाता है कि 2022 में जनता के लिए पिक्सेल वॉच या स्मार्टवॉच जारी होने से पहले Google इन मुद्दों के स्थायी समाधान ढूंढ लेगा।
Indian Prime Minister Narendra Modi has suggested to download Aarogya Set App. Aarogya Setu is a coronavirus tracking app launched by the Government of India on 2 April. It is the first official coronavirus tracking app in the country. Let us see how to use this app.
Aarogya Setu is a Sanskrit Language word which means "A bridge of health".
The app has been downloaded by over 15 Mn users. Let us read about the Aarogya
Setu app, how it works and how to use it.
Aarogya Setu is a Sanskrit Language word which means "A bridge of health".
The app has been downloaded by over 15 Mn users. Let us read about the Aarogya
Setu app, how it works and how to use it.
Aarogya Setu app will help the people of the country to know
about the exact situation of the coronavirus. The app is available for both
android and I Phone users and mobile phone users can download it from play
store or Apple's App Store.
As we know that the cases of COVID-19 in the world including India are
increasing. The Government of India has already MYGov app to spread awareness
about the coronavirus outbreak. But a dedicated coronavirus tracking app
'Aarogya Setu' is also launched that will use the Smartphone’s location data
and Bluetooth to check if you have been near a COVID-19 infected person or not.
It is the first dedicated coronavirus tracking app in India.
In India, cases of coronavirus crossed 4000. Therefore, the government has
come up with a new strategy called mobile surveillance. The Government of India
has launched the app to make people aware about the coronavirus pandemic, its
cases in the country and also to track the cases.
About Aarogya Setu App
The Aarogya Setu app will use the location of the Smartphone and Bluetooth
to determine whether you had come in contact with a positive person. This app
is totally dedicated to COVID-19. It will also tell you whether you are in and
around a high-risk zone. If any of the contacts tested positive, the app will
calculate the risk of infection.
How to use Aarogya Setu App?
In India, the app is currently available on both Google Play and the Apple
App Store for Android mobiles and iPhones.
The description of Aarogya Setu on the Google Play store is:
"Aarogya Setu is a mobile application developed by the Government of
India to connect essential health services with the people of India in our
combined fight against COVID-19. The App is aimed at augmenting the initiatives
of the Government of India, particularly the Department of Health, in
proactively reaching out to and informing the users of the app regarding risks,
best practices and relevant advisories pertaining to the containment of
COVID-19".
- First Install the app
- Switch on Bluetooth and Location
- Set the location sharing to 'Always'.
When the app is installed in a Smartphone it will detect other devices with
Aarogya Setu installed that come in proximity of that phone. The app currently
supports 11 languages, including Hindi and English.
- After installing the app, it will ask for the desired language making it
more accessible.
- It is required to register your mobile number and provide necessary
details like name, age, profession, international travel.
- After submitting the details, it will cross-checks the detail present in
the government database and uses the proximity of Bluetooth and suggests
whether you are safe or not.
- In case you are not safe then the app will suggest you to isolate and take
precautions.
Note: Data provided by the user is said to be encrypted and it is
also sent to the government's server anonymously.
- The app will also check the user’s location of around six feet that is
whether he or she was in the proximity of an infected patient by using the
device Bluetooth.
The app will show that you are at a 'high risk' or not. In case you are at a
high-risk area then the app advises you to go for a test and call the toll-free
number 1075 to schedule an appointment at the nearby testing centre.
Not only this, the app will also suggest preventive measures tips for
coronavirus. In case, if a person is tested positive for COVID-19 or has been
in contact with the person then the app will share data with the government.
Also, the privacy policy of the app is not to share data by third-party users.
- Invite your friends and family to install the app.
No doubt the app will help the Government to take necessary steps for
assessing the risk of spread of COVID-19 infection and ensuring isolation where
required. However, now you may have come to know about the app and also how to
use it.
Are you looking for a free, easy, step-by-step guide on how to start a blog?
My free guide on this page will show you how to create a blog that is beautiful and functional, all in an easy step-by-step tutorial (with pictures).
Should you start a blog?
One of the misconceptions about starting a blog is that you need to be a great writer to be successful. Nothing could be further from the truth. People read blog sites to get a personal perspective on things, so most bloggers write in a very informal and conversational style.
In addition, you don’t need to be an expert on your topic in order to have a successful blog. For example, readers of a cooking blog don’t want to read a textbook from a food scientist, they want to hear the experiences of someone who has actually cooked some real meals, mistakes and all. To be successful as a blogger there is really just one requirement: a passion for your topic.
At its heart, blogging is about sharing your knowledge with the world. Choosing a topic that you are passionate about makes the process of starting a successful blog so much easier. Writing about more than one topic is totally fine too. As long as you are writing about things that you are genuinely interested in, your passion will shine through and keep your readers interested.
So why would you go to the trouble of blogging? There are a few reasons:
Make money from home. Blogging can be quite lucrative if done correctly. The top bloggers in the world obviously earn quite a bit, but even a part-time blogger can expect to make a nice profit if things are done correctly. The best part about it is that blogging is a form of passive income, since you can spend just a few hours a week writing a blog post and then continue to make money from it long after the blog post is written. I go into much more detail on how to blog for money later in this guide.
Share your story. A blog allows you to have a voice and be heard. You can share your story with the entire world if you so choose. One of the most common ways blogs are used are as a diary where the blogger writes about their daily experiences so that friends, family, and others can all be a part of their lives.
Recognition for yourself or your business. No, you probably won’t have paparazzi following you around because of your latest blog post. But a successful blog makes your idea into a reality, and can gain you a ton of recognition in your respective field. Many bloggers are known as experts just because of their blogs, and some have even gotten book and movie deals based on their blogs.
Find a community. Blogging at its heart is interactive. You write a blog post and people comment on it. This is a great way to connect with people who are interested in the same things as you are. Blogging allows you to teach these people based on your experience, and it gives you the opportunity to learn from your readers as well.
The good news is that the internet is exploding with growth right now. More people than ever are online. This explosion in growth means more potential readers for your blog. In short, if you are thinking about starting a blog then there is no better time than right now.
So, just how do you start a blog?
How to Start a Blog in 6 Steps
Learn how to create a blog in about 20 minutes following these steps:
Pick a blog name. Choose something descriptive.
Get your blog online. Register your blog and get hosting.
Customize your blog. Choose a free template and tweak it.
Write & publish your first post. The fun part!
Promote your blog. Get more people to read your blog.
Make money blogging. Choose from several options to monetize your blog.
Let’s start your blog!
Step 1: Pick a blog name
The first step to finding a good blog name is choosing your topic.
If you’re not sure what to blog about, there are a few ways to find a good blog topic:
Hobbies & passions. Hobbies or other interests you are passionate about are a great place to start. Cooking, travel, fashion, sports, and cars are all classic examples. But even blogs about more obscure hobbies can be successful, since the your audience is literally anyone in the world with the internet.
Life experiences. Everyone has lessons they have learned through life experience. Sharing this knowledge can be incredibly helpful to others in similar situations. For example, I recently helped a woman start her blog about being a fireman’s wife. She has a lot of experience and knowledge to share with others about this topic, and it has helped her connect with others in similar situations.Think about the things you have experienced in life. This could be related to your family (example: a blog about being a stay at home mom), work (a blog about experiences dealing with clients), or other life experiences (a blog about dealing with a troubling time such as a disease or divorce, or about a happy time such as preparing for a wedding or a birth of a child).
A personal blog. A personal blog is a blog all about you. This will include a variety of topics, from things you do on a daily basis, to random thoughts and musings. This is a great way to share you thoughts with the world without having to stick to just one topic.
Once you have a topic it’s time to choose your blog name. A good blog name should be descriptive so that potential readers can instantly tell what your blog is about just from the name.
If you are blogging about one specific topic then you will definitely want to include that in some way in your blog name. Try not to get hung-up on just one word though. For example, a cooking blog doesn’t necessarily have to have the word “cooking” in it. The words “food”, “recipes”, and “meals” would also let people know that your blog is about cooking.
If you are planning to create a personal blog where you discuss a variety of topics then I recommend using your name, or some variation of it, since your blog is all about you. For example, I own the blog scottchow.com. You can also add your middle name or middle initial if you find your name is already taken. Or you could use a variation like “Scott Chow Blog” or “Blogging with Scott”. Can’t decide on a good name for your blog? Contact me and I will help you personally (for free)!
Once you have some blog name ideas you will need to choose a domain extension.
A .com domain extension is the most preferred, but .net or .org work as well. It is also important to note that for the purposes of a blog domain you cannot have any spaces between words. So “Blogging with Scott” becomes tfdevloper.blogspot.com
Now that you’ve got your name and have picked an extension it’s time to make sure that no one else has already registered the same name:
See if your blog name is available
Note: You cannot use any spaces or punctuation other than dashes in a domain name.
If you find that the name you wanted is already taken there are a few things you can do:
Try a different domain extension. If the .com version is already registered you may still be able to get the .net or .org version of your blog name.
Add small words. Words like “a”, “my”, or “the”. For example, this site is called TheBlogStarter.com instead of BlogStarter.com.
Add dashes between words. For example, scott-chow.com
Step 2: Get your blog online
Now that you’ve got a name picked out it’s time to get your blog online. This might sound hard or technical, but the steps below will walk you right through and make the process easy.
To get your blog up and running you need two things: blog hosting and blogging software. The good news is that these typically come packaged together.
A blog host is a company that stores all of the files for your blog and delivers them to the user when they type in your blog name. You must have a blog host in order to have a blog.
You also need to have the software to build your blog. In this guide I will be showing you how to build a blog using the WordPress blogging software, because it is the most popular, customizable, and easiest to use. The blog host I recommend, and the one I show you how to use in this guide, is BlueHost. I personally use BlueHost and I recommend them for all new bloggers because:
They will register your blog name for you for free, making sure no one else can take it.
They offer a free, simple installation of the WordPress blogging software (which I show you how to use in this guide).
They have been recommended by WordPress since 2005 and currently host over 2 million blogs and websites.
They have helpful 24/7 customer service via phone or web chat.
They have a 30 day money-back guarantee if you are unsatisfied for any reason.
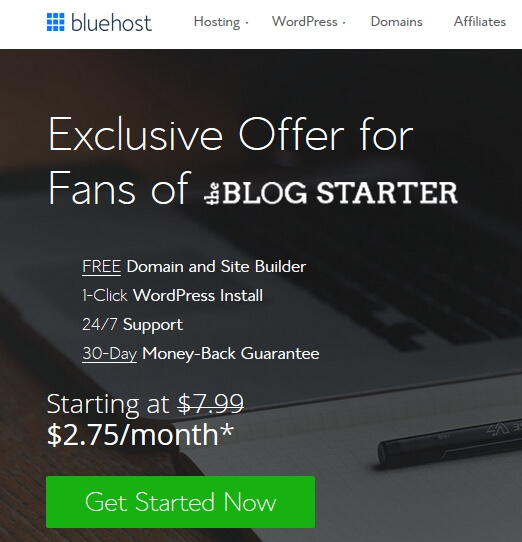
Use any BlueHost link on this site to make sure you get the special discount price of $2.75 per month. Disclosure: BlueHost compensates The Blog Starter when you purchase through this link, so my services are free of charge to you! In fact, if you have any trouble at all setting up a blog with this tutorial, just contact me and I will do it for you (free!).
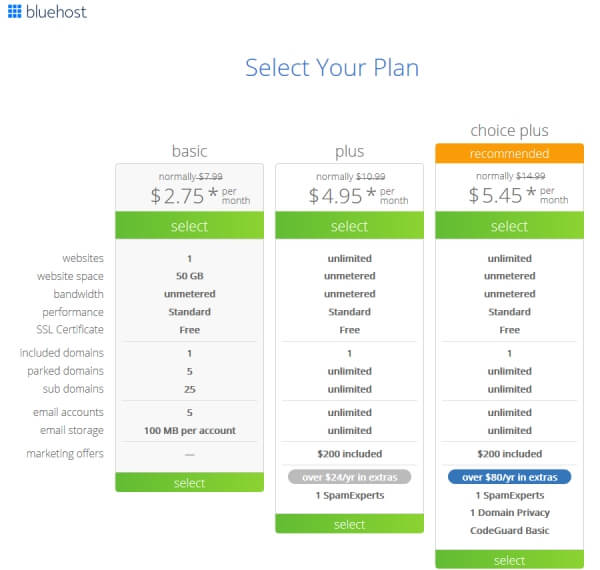
2. Select your plan. I recommend that new bloggers get the basic plan. Click “Select” to choose your plan.
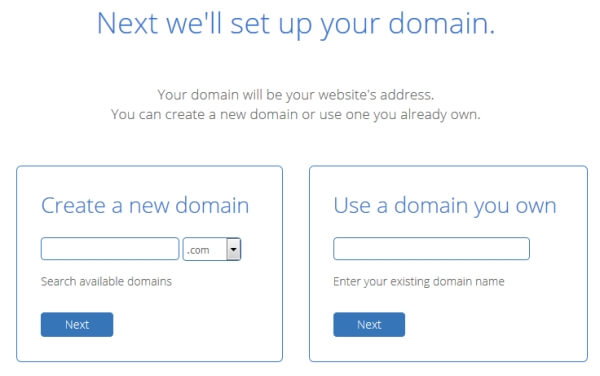
3. Type in your domain name in the left box and then click “next” to start the registration process.
If you already own a domain name and want to use it for your blog, type your existing domain in the right box and then click “next”. Only use the right box if you have previously paid to register a domain!
4. Fill out your billing details on the registration page.
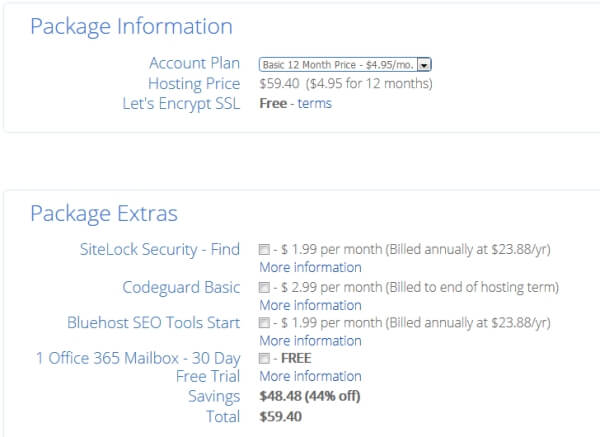
5. You will also need to choose your hosting package and options.
All packages have everything you need to get your blog up and running, including a free domain name, easy WordPress blog installation, web hosting, and branded email accounts (e.g. yourname@yourdomain.com).
The 36 month package gets you the lowest monthly rate, while the 12 month package has a lower up-front cost.
I uncheck the boxes next to the other products when I sign-up. You can always get these products later if you decide you need them.
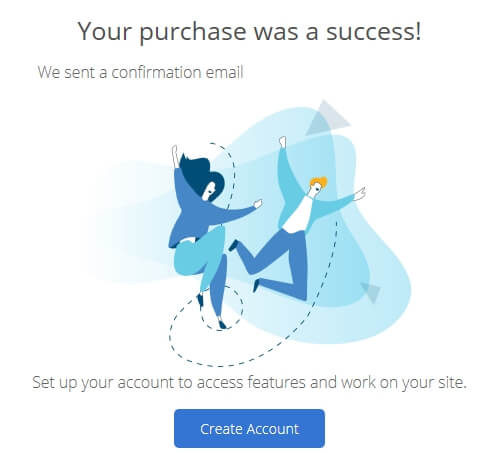
6. You will then need to create your account and password.
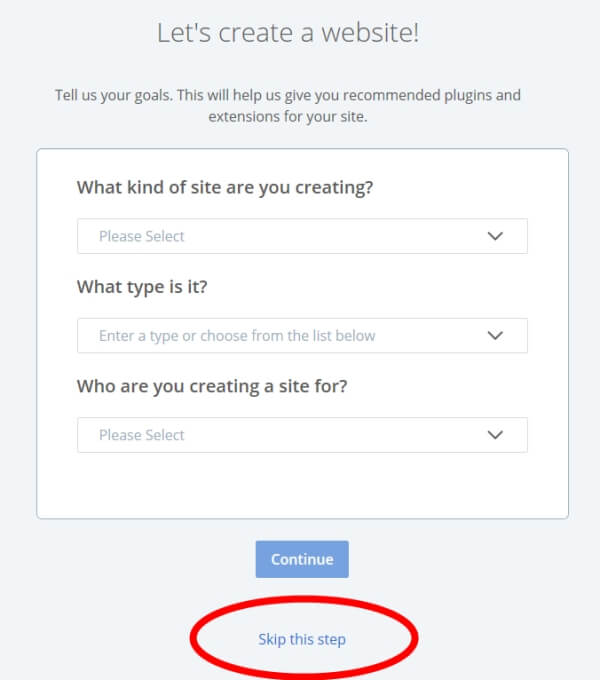
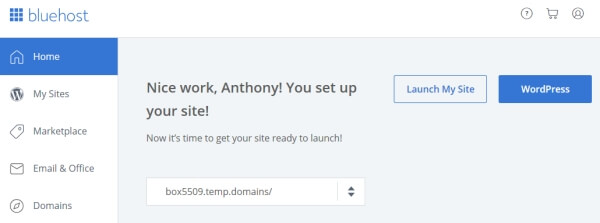
Once you do that you will be taken to an installation helper. Since you are following this tutorial you can just click “Skip this step” on the next few pages to be taken directly to the dashboard.
Now your blog software (WordPress) will be installed. Once the install is complete click the blue “WordPress” button to be logged-in to the administrator area of your blog. Having trouble installing your blog? Get help here.
Step 3: Customize your blog
Logging in
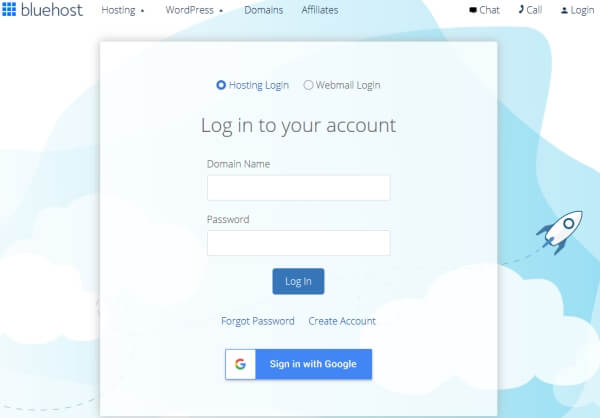
If you are not already logged-in from the previous step, go to Bluehost.com and click “Login” on the top right to bring up the login screen. You can then login using your domain name and the password you set in the previous step. If you have misplaced your password you can reset it by clicking the “Forgot Password” link. Once you log-in you will be taken to your BlueHost Portal. From the portal you can click the blue “WordPress” button to be logged-in automatically to your blog.
Changing your blog design
Once you login you will be in the WordPress administrator area. This is where you can make any changes you want to your blog.
Everyone has a different idea of how they want their blog to look. One of the great things about a WordPress blog is that you can change your entire layout and design with just a few clicks.
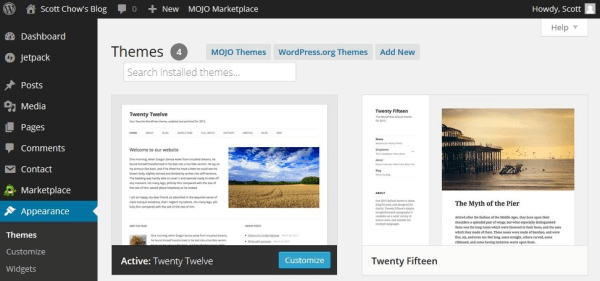
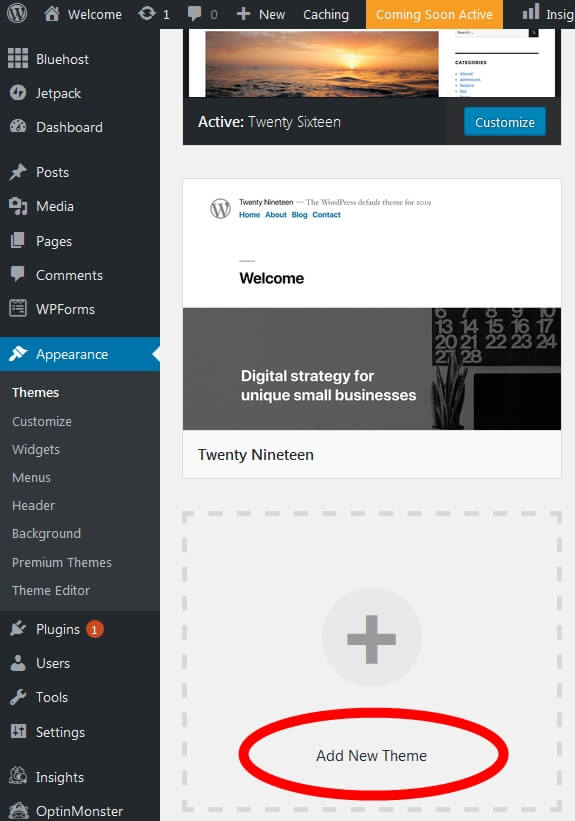
In WordPress, blog layouts are known as “Themes”. What is a blog theme? Themes control the entire design of your blog. To change your theme you are going to click on the “Appearance” tab on the left menu.
You will see several themes are already installed on your blog: Twenty Seventeen, Twenty Sixteen, etc. These are well-designed, clean-looking themes that can work for just about any type of blog. In fact, many of the world’s top bloggers use one of these themes.
Unless you have a very specific design in mind for your blog, I suggest you use one of these themes to start with. For our example, let’s use the “Twenty Sixteen” theme. In order to activate the theme on your blog, hover over the theme and click the “Activate” button. That’s it! You have changed the entire design of your blog with just one click!
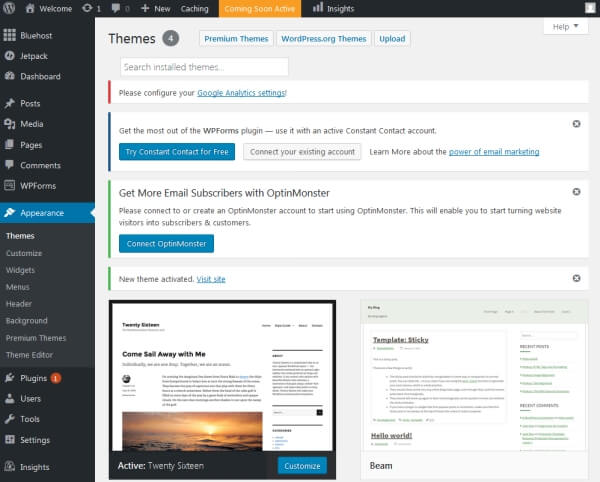
If you don’t like any of the themes that are already installed you can easily choose from thousands of other free themes. To install a new theme, click on the “Appearance” tab on the left menu and then click “Add New Theme”.
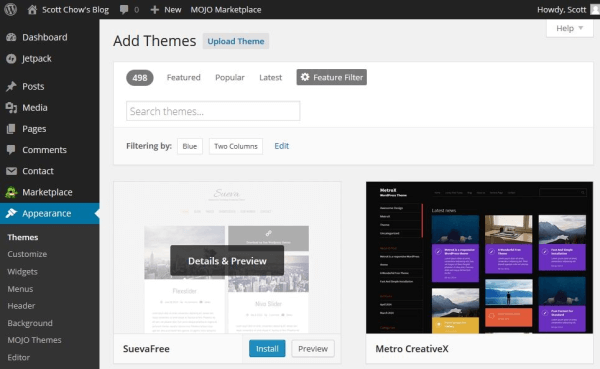
This is the theme search screen. There are thousands of themes to choose from. You can change your entire design at anytime simply by activating a new theme. To find a theme you like, I suggest you click on the “Popular” tab and start browsing. When you find one that you like click the blue “Install” button.
Once the theme is installed click “Activate” to activate the theme on your blog. To see your new theme in action, go to your blog and take a look!
Changing your theme is the simplest way to customize your blog, but there are lots of other customizations you can do. Check out my full post on customizing your blog for an in-depth step-by-step guide. You can also watch the video at the end of this guide to see me completely customize a blog from scratch.
Step 4: How to write a blog post & publish it
Now that your blog is up and running it’s time to actually do some blogging!
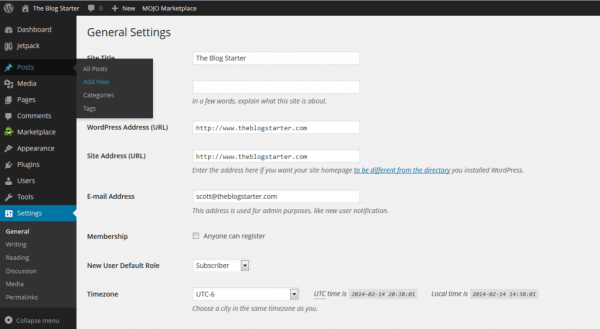
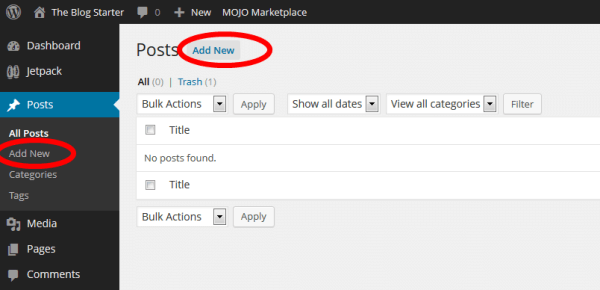
Go to the left menu and click on “Posts”.
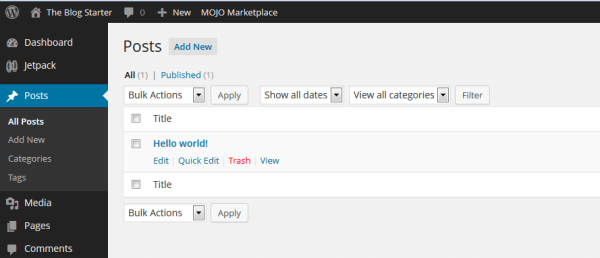
You will see there is already a post there. This is a default post on every new WordPress blog, and we don’t need it. To delete it click “Trash” just under the post.
To begin writing a new post, click the “Add New” link.
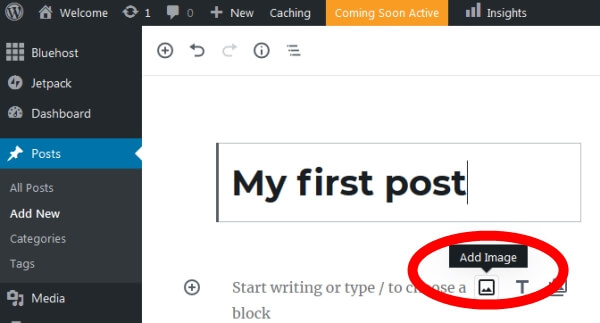
You are now on the post editor screen. Enter the title of your post in the top box and then begin writing your post in the lower box.
If you would like to add a picture to your post, click on the “Add Image” icon and click “Upload” to upload a picture from your computer. You can make adjustments to the picture size on the next screen. When you are ready click “Insert into post” to add the picture.
Once you have finished your post just click the “Publish” button on the top right side of the screen to publish it.
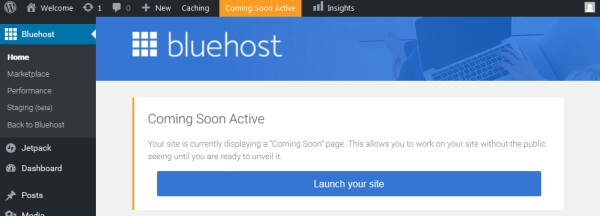
Publishing Your Blog
Even after you have written a post your blog may still be showing a “Coming Soon” page.
When you are ready to make your blog public just click the “BlueHost” menu at the top left of the menu in your administrator area then click the blue “Launch” button to remove the “Coming Soon” page.
Congratulations! You now know how to start your own blog and publish content!
For more info on blog content guidelines, click the tabs below:
Content That Should be on Your Blog
There are two main types of content your blog should provide: static and dynamic content. Static Content: Each blog should contain a few necessary pages explicitly designed to provide the visitor with the tools they need. The content on these pages is static, meaning – the content doesn’t change, or at least not very often. These are mainly top-level pages that can be accessed via a menu on your blog.
These static content pages should be in place well before you launch your blog to the world.
Important static pages to include:
About Me (Us) – This page should include a biographical summary of the author(s) as well as a mission statement. Think about the answers to these questions: How did your passion for the subject matter develop?What do you want to convey to the world?What is your ultimate goal?
Contact Me (Us) – A contact page provides the visitor a place to reach the author which, in turn, provides the visitor with the reassurance that you are a real and reachable author. You can add your physical address, phone number, and email. Or you can utilize a simple contact form to keep your personal identifying information private. You should put links to all of your social media accounts here as well.
Aside from your blog, which is generally introduced on the home/main page, these two all-important pages should be visible on your top (header) menu and easy to access. You can take a look at the top of this page to see how I have these pages included in the header menu. See this detailed guide to customizing your blog menus if you need help.
Other static pages that are equally as important but less commonly thought of are:
Disclaimer Page: If you intend to make money from your blog, you must describe the ways you intend to generate income. This is an absolute must-have page that should not be overlooked, as per FTC guidelines. For example, if you are discussing and endorsing a product, and stand to monetize from affiliate links to this product, this relationship must be disclosed.
Privacy Policy: If you collect data from your visitors in any way, you are required to add a privacy policy page that tells visitors exactly how you are collecting data, how you are using it, and if you are sharing that data. If you implement Google Adsense or Google Analytics on your blog, a Privacy Policy must be used. This page is required by the CCPA (California Consumer Privacy Act) and the GDPR (General Data Protection Regulation).
Terms of Service: If your blog is also running a store or selling services, it is best to have a lawyer draft your Terms of Service page to lessen liability and provide maximum protection.
These required static pages are typically found in the footer of a blog. They should, at the very least, be visible and accessible from the home page. Again, look at the bottom of this page to see how this looks in practice.
There are other static pages you can choose to include depending on what suits your blog and business. Common static page examples are an advertising page to solicit paid advertisements, a donations page, a resource page to direct visitors to your favorite links within your field, and a page for submitting ideas and content. Dynamic Content: Your dynamic content is your blog and the most important content you have to offer. This is where you, as the creator, will infuse the blog with your brand of informative blog posts that supply your audience with knowledgeable tips, facts, opinions, and stories. This is how you engage your visitors and keep them coming back for more.
Your blog posts should be regularly submitted at specific intervals. Waiting months to create a post will never build a following. Posting weekly and driving traffic to these posts will help build your brand.
How to write a great blog post
Each blog post should be lengthy, informative, and engaging. It’s not always easy to come up with different topics on a regular basis and you are free to mix up the tone and even the subject matter to keep things lively and interesting. It’s your space, after all. But there are a few elements that each and every blog post should endeavor to include. Define the Blog Post: Create an alluring post title that stimulates curiosity and encourages clicks. Use the first paragraph of your post to clearly define the topic of your article and provide a possible hook to keep the reader reading. The Longer the Better – But Break It Up: The more information and detail you include, the better. But readers will begin to skim if the content contains lengthy paragraphs a mile long, and readers will pop out faster than they came in. Readers enjoy tidbits. Keep your paragraphs short with spaces in between, use lists and standout quotes, use images, and always include headers and subheaders so that readers can find what they’re looking for. Engage The Reader: At the end of each blog post, a common tactic used to engage readers is posing a meaningful question to your audience and asking them to reply in the comments. This simple measure can increase engagement tenfold. Original Content: Your blog posts should always be original. Never plagiarize – you will eventually be called out on it and could even face consequences. Your content should come from your heart, your brain, your knowledge base, and your experience. You can get topic ideas from others in your field, but make sure the content comes from you. Original Photos: While it is easy to include stock images from free image sites, it is even better to include your own photos and graphic work. Another idea is to take free images and manipulate them with a free photo editor. Edit Your Work: Make sure your blog posts are sufficiently edited. Nothing says unprofessional like several typographical and grammatical errors. If you need a few refresher courses in grammar, consider using a writing application.
Step 5: Promote your blog
Creating a well-designed blog and writing great content is just the start. In order to get readers for your blog you will need spend some time promoting it, especially when you first start. Click on the strategies below for more info. For more tips on promoting your blog make sure to check out my in-depth guide to blog promotion.
Alert Your Inner Circle
The very first people who should become aware of your blog are your inner circle. This includes family, friends, and colleagues within your field. Encourage them to become followers, ask them to mention your new blog, and – most importantly – thank them.
Use Social Media
While you don’t want to overdo it with social media accounts, you still want to create accounts with the “biggies”. Create a Facebook page, Twitter account, Pinterest account, and Instagram account to start. You should post each new blog post on your social media accounts, but you can also post relevant news and links to other sources that your readers may find interesting. Don’t forget to use hashtags and engage with your followers!
One of my favorite ways to get readers to my blog is to post links on my social media accounts like Facebook and Twitter. This is great, because not only do your friends see the link, but if your friends share the link with their friends it automatically multiplies your readers. If you have created high-quality content on your blog then social media is a great way for your blog to go viral.
Comment on Other Blogs
Find other blogs in your community and engage with them. Using the comment section, introduce yourself and leave engaging and constructive comments. Many will allow you to leave a link to your blog. After creating relationships with prominent bloggers in your community, you will find yourself within their ranks quickly.
Engage with Your Readers
When your readers leave comments on social media posts or on your blog, always engage with them. Reply to their comments and questions, give them “likes” and affirmations. When it is obvious that the author cares about his/her community and readership, visitors are naturally encouraged to return.
Collaborate
Become enmeshed in your blogging community by collaborating with respected members of your field. Collaborating includes guest posting, promoting each other’s blogs and products, and regularly interacting through comments and social media.
Post Regularly
Post content regularly. Create an editorial calendar and stick to it. A good blogger posts at least once per. If you have long lapses between posts, your followers will drop off and your growth will be severely hampered. It’s not easy to post on a schedule, but it’s something you absolutely must stick to.
Create an Email List
In addition to getting new readers to your blog, you will also want to make sure your current readers are coming back. This is where email marketing plays a big role. By collecting the email addresses of your visitors (with their permission of course), you can then notify them when you post something new on your blog. This keeps people coming back to your blog, which not only gives you more readers over time, it also allows you to build a closer relationship with your visitors.
Email marketing is too big a topic to cover well here, so I created a separate guide to email marketing for those who are interested (hint: every blogger who wants more readers needs to read this guide).
Submit to Search Engines
You want search engines to include your blog in their search results as soon as possible. Google: Sign up for a Google Webmaster account and open the Search Console. To add your blog, click “Add Property” and follow the steps to add your blog. Bing: Sign up for a Bing Webmaster account and add your blog.
SEO
SEO (Search Engine Optimization) is the process of optimizing your blog to receive traffic from search engines like Google. Submitting your blog to search engines is the first step. However, keep in mind that with a brand new blog your search engine results are going to be minimal to start with. However, this will change over time as long as you continue to add informative and relevant content on a regular basis. The more you add, and the more time that goes by, the better your search engine results will become. And search engine results lead to traffic and a larger audience.
With regards to SEO, each blog post should include these fundamental elements:
Header Tags: Section headings and subheadings should be wrapped in header tags. To do this, click on the left item of the block you are writing in and change it to “Heading”. You can then choose from H1, H2, H3, etc.
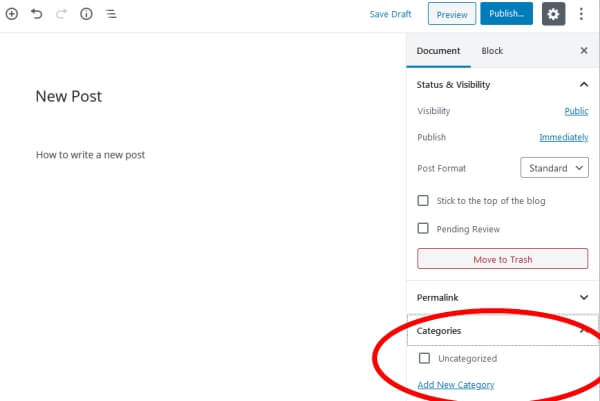
Categorization: Search engines depend on hierarchy. Your posts should be clearly categorized into specific and relevant categories. In the post editor screen, click on “Document” on the right menu, and then go down to “Categories” and “Add New Category”.
Permalinks: Each blog post “slug” is the end portion of the URL. You want to make sure each blog post has a defined slug and doesn’t end with an article number. You can easily change this in your WordPress dashboard by going to “Settings” -> “Permalinks”. Select the “Post Name” option and click “Save Changes”
There are many more factors relating to SEO, but these are the big ones that will help your blog appear in search engines sooner rather than later.
Step 6: Make money blogging
Once you have put in the effort of creating great blog content and promoting your blog, making money from your blog is actually the easy part.
Blogs have the potential to be extremely lucrative, but don’t assume that you’re going to start making money in the first week, or even in the first month. It could take six months to a year to start seeing a steady stream of income. Blogging takes work and dedication, but once you develop a large enough audience, there are several methods you can employ to monetize your blog. For more information see my full guide to making money blogging here. Click on the tabs below for details on a few methods you can use.
Sell Advertising Space
Once you have a popular blog, advertisers will be hounding you for the opportunity to advertise. The best way to take advantage of this situation is to use Google Adsense. Google finds the advertisers for you and all you have to do is place the Google Adsense code on your blog to start running ads. Google Adsense takes all of the hard work out of the process and just cuts you a check.
I go into the full details of how to set up Google Adsense for your blog here.
Affiliate Programs
An affiliate program is a commission-based way to advertise. When one of your readers clicks on a link on your blog, they get sent to an advertiser’s site and you earn a commission if they purchase. Affiliate links are a great way to earn income through the use of product reviews. However, you must remember to disclose your affiliation.
Selling Products and Services
Selling your own products and services directly on your blog is a great way to increase your income. As your blog grows and you begin to see a wide audience, your products and services will begin to sell themselves.
Use the sidebar of your blog to increase the visibility of what you sell using visual images and a link to your storefront page.
Digital Downloads
Ebooks, video tutorials, and e-courses are the most commonly consumed digital materials sold by bloggers. With little to no overhead and no shipping costs, you can keep the price low and inviting.
If you are extremely knowledgeable in your field, an ebook can practically write itself. Give it a try, you might surprise yourself!
Memberships
Another way to monetize is by creating membership options on your blog. This allows you to offer members more exclusive content only available with a paid membership. For example, you could offer unlimited downloads of digital goods, free consultations, a private network or forum where community members can mix and mingle, and private content available to members only.
There are many ways a blog can capitalize on popularity and traffic. Choosing the way you monetize from your blog depends on your goals and the purpose of your blog. Those who are selling services, physical goods, and digital goods, for example, may not want to participate in affiliate programs where traffic could be lost to another site.
Take the time to explore the many ways you can make money from blogging. It will take time before you ever see your first penny. But with dedication, love, and attention, the income will spring forth.
Need more help?
I hope this guide has answered any questions you had on how to start a blog, but if any of the steps were unclear to you, you can find a more detailed version of each step by using the menu at the top right of this page (or at the bottom of this page if you’re on a smartphone).
How do I start a blog? You can watch me build and customize a beautiful blog from scratch here:
The video above should answer a lot of questions you might have about getting your blog set up and customized, but more specific tutorials can be found on my blog page. Here are some of the most popular tutorials from my blog:
Contact me if you have any issues at all and I will personally respond to your email.
The step-by-step guide on this site should give you everything you need to get started, but if you run into some issues, or just want some personalized advice, please do not hesitate to contact me at any time. Blogging is my passion, and I would love to talk with you about it!
Blogging FAQ
Still have some unanswered questions about blogging? Below are the most common questions I get about starting a new blog. If you can’t find an answer to your question here, feel free to send me an email via my contact page, or leave a comment below. Click on a question to read the answer:
What makes a successful blog?
You. It is your passion, your creativity, your knowledge and expertise, and what you bring to the community that makes a blog successful. As long as you provide content that is interesting, informative, and engaging to the readers you’re looking to connect with, your success is only limited by the number of posts you’re able to produce.
Keep writing, keep interacting, keep engaging, and your blog is bound to become a success. As long as you’re passionate about the subject matter, the sky is the limit.
What do you need to start a blog?
Time, passion, and a clear goal.
Blogging is nearly a full-time operation. A successful blogger commits to posting lengthy and detailed articles at least weekly. Promoting the blog must also be done regularly across social media sites and through peer interactions.
Equally important is the passion behind your blog. To come up with great content on a regular basis your blog should revolve around a topic that you are obsessed with. You don’t have to be the leading authority on the subject matter. You only need to possess passion, excitement, dedication, and deeply rooted opinions.
You also need a clear goal in mind. What is the main objective of your blog? Is it to inform the public? To make money? To eventually retain paid subscribers? With a clear final objective you can grow a blog that satisfies these goals in the long term.
What should my blog be about?
Answer these questions: What are you passionate about? What do you think about daily? What topic do you annoy all of your friends, family, and co-workers with on a regular basis? What do you find yourself dreaming about? What do you find yourself constantly researching? What do you read about?
If there is a common denominator in your answers to these questions – THAT is what your blog should be about.
Your blog should be about what interests you – what you’re passionate about. And once you begin to build your blog, no matter what the subject material, you will find a community of people who are interested in what you have to say.
How do I find a profitable niche for my blog?
If you know the general topic for your blog, a great way of making your niche more profitable is by narrowing the niche to eliminate competition.
For example, let’s say you’re passionate about food and you want to create a recipe blog. You’ll be competing with a million recipe blogs. So let’s narrow that topic down to something that is more manageable yet still important to a lot of people. Making the topic of your blog more specific such as “Inexpensive Keto Recipes” will help to eliminate a lot of competition and elevate your blog results in search engines for more specific queries.
How do I name my blog?
This can ultimately be a fun exercise.
As an example, let’s say your blog will be about custom pet gift baskets. In this instance, let’s list all the main words this blog will be about.
Now let’s list some variant synonyms of these words. Use a thesaurus if need be!
Now list nouns and adjectives that apply to you as the creator.
Now start putting words together, introduce new words, and keep playing around until you come up with a name you like!
What do you do if your domain name is taken?
If the domain name you want is taken and the full domain name is your trademarked business name, you can assert your trademark rights and privileges and eventually get this domain handed over to you. It is a lengthy process that will involve lawyers and hefty fees, but as long as the name is trademarked by you, you would likely win the domain name.
If your name isn’t trademarked, don’t attempt to buy the .info or .biz variation of the domain. Instead, try a slight variation of the domain name such as adding a dash between words, or inserting the word “the” or other nominal words.
In some cases, the domain is owned but isn’t being used. Trying searching for it in the browser. If the URL is pointed to a different domain, it isn’t being used, only redirected. You may be able to buy the domain for the right price from the current owner. If the domain is parked, you may also attempt to purchase the domain.
Where is the best place to create a blog?
In the tutorial on this page I show you how to create your blog using BlueHost and WordPress.org. This is the combination I personally use for this blog and it’s what I recommend to all my readers. When you sign-up with BlueHost you get a free domain name, and WordPress.org will be automatically installed on your BlueHost account. You can customize and begin blogging as soon as your account is set up. Just follow the steps in the tutorial on this page.
How much does it cost to start a blog?
You can make a blog for absolutely nothing. It doesn’t cost one red cent.
But let’s be realistic. If you want your blog to be taken seriously, you can’t just get a subdomain from BlogSpot. You’ll want to buy your own domain name. Domain names cost around $15 per year, on average. So now you’re a whopping $15 in the hole.
But the best way to start your blog is through paid web hosting. A WordPress hosting account through Bluehost is $2.75 per month and includes free domain registration, so your total cost for 1 year is just $33.
These are your main costs associated with starting a successful blog. Of course, you may incur other costs with additional services such as email marketing. As with any business, the biggest expenditure is often advertising, but this would be a cost incurred later on down the road if you choose to go that route.
Do bloggers make money?
Bloggers have the ability to make a full-time income from blogging alone. Some bloggers make hundreds of thousands of dollars. While it isn’t easy to become a highly paid blogger, it is quite possible. As with any business, it takes a lot of hard work and plenty of time.
Many bloggers give up on their project after just a few months. They become discouraged when the money doesn’t come in right away, and it almost never does without an instant and immediate following that comes from being a high profile persona. Therefore, time and patience are needed to reach “influencer” status. Those who make money blogging are the ones who stick with it.
There are several ways a blogger can earn money:
Advertisements: As your blog gains traction and brings in a healthy amount of daily visitors, advertisers may pay good money for a well-placed ad on your blog.
Contextual Ads: With Google Adsense a small piece of code can be placed on your blog that dynamically shows ads related to your content. When one of your readers clicks on an ad the advertiser pays Google, and Google sends you a percentage.
Affiliate Programs: Affiliate ads are a very popular way to monetize a blog. These ads lead visitors to a product or service on another website. If a sale resulting from a click on your blog is made, you get a commission, and some commissions can be very high. Affiliate programs can be found on individual stores, or on large-scale platforms such as Amazon.
Sponsored Posts: Advertisers can pay a smaller fee to sponsor individual posts rather than advertising on the entire blog. This is a great method for making money on fledgling blogs.
How do bloggers get paid?
Bloggers are most commonly paid by advertisers. How the blogger is paid varies depending on what type of ads are used.
CPC: CPC or “Cost Per Click” ads generate revenue simply through clicks. CPC ads are generally highly targeted and rotational. Ads appear on specific blog posts and are related to the content of that post. The number of clicks you generate, which trends upward as your traffic increases, will ultimately determine the amount you are paid.
Flat Fee: If a blog’s traffic is high, advertisers may pay a monthly flat fee for ad space on the blog’s website. That ad space could appear all over the website, within a section, or just a few pages. The money comes directly from the advertiser.
Commission: Ads from an affiliate network use affiliate links. These links track visitors that come from your blog to the advertiser’s site. If a purchase is made by a visitor who originated from your blog, you receive a commission.
Should I start my blog on WordPress?
If you’re new to blogging and you don’t have much experience with HTML or coding, then yes – WordPress is for you! WordPress is the most popular CMS (Content Management System) in the world with over 75 million blogs and websites currently using it. And there are many reasons why:
Easy to Use: WordPress is remarkably easy to use. Theme customizers help to easily design your blog, change colors, and add images. Once your design is complete, all you need to do is write blog posts. The internal blog editor records your posts and displays them for you.
Blog Anywhere: As long as you have Internet access, you can edit your blog and write new posts. WordPress provides you with an administrative backend where you may log in and work on your blog from anywhere in the world using a PC, Mac, tablet, or smartphone.
You Don’t Need To Know How to Code: WordPress gives you easy tools to create a stunning blog without knowing a single line of HTML code. This makes WordPress a great option for those who don’t want to deal with technical issues.
Built-in SEO: Google and other search engines favor blogs built with WordPress. The out-of-the-box SEO (Search Engine Optimization) which comes packed with WordPress delivers impressive results over time in search engines. The powerful SEO in WordPress blows away the competition, clearly distinguishing itself from other CMS systems. This translates to more readers for your blog.
Free Themes: The WordPress CMS is connected to a repository where thousands of free themes (blog layouts) are available to browse and upload. Directly from the backend of your blog you can browse a multitude of themes with varying styles and functionality. These free themes can be installed with one click, and then easily customized by a total novice.
Is WordPress free?
Yes! WordPress is an open-source CMS system which is completely free. And there are two different WordPress options, both free but COMPLETELY different, which you should be aware of. WordPress.org: This option is completely, 100% free. WordPress.org is the platform I show you how to use in the tutorial on this page. While it is completely free to download, it doesn’t run on its own. You will need a web hosting account (see the step-by-step guide) and you’ll also require a domain name. So while WordPress is technically free, there are fees involved with getting your new blog up and running (less than $3 per month). WordPress.com: WordPress.com is a blogging platform that gives the user a free blog on a subdomain of WordPress.com. If you would like to enable some basic options, or have your own domain, you will have to upgrade your account to a paid one. For this and other reasons, I don’t recommend WordPress.com.
How often should I blog?
If your goal is to eventually make money from your blog, you’ll want to blog as often as possible – at least once per week. Blogging can be casual if your goal is solely for personal pleasure. But if you’re seeking a large audience and wish to become a leader in your field, blogging weekly is a must.
While frequency is important, it should not come at the expense of quality. Not every blog post needs be 2,000 words, but all of your posts should be informative and of value to your audience. This is no easy feat. However, if you’re able to stick with blogging on a regular schedule, it will become easier! As with anything else, the more you do it – the more skilled at it you become.
Blogging weekly also helps improve your traffic from search engines. When you first begin blogging your latest posts will take time to show up on search engines. As you continue to post regularly you will naturally have more blog posts showing up in the search results, which means more traffic to your blog.
Why do blogs fail?
Almost any blog has the potential to become a success, yet most blogs fail. And there are many reasons why. Here are the most common reasons why a blog fails:
Giving Up Too Fast – The most common reason why a blog fails is simply that the content creator gives up before his or her blog even has a chance to become recognized. Before you begin a blog, you should realize that most blogs take months and even years to gain traction. It’s quite an investment. If you fail to gain visitors or make money within a month don’t stop! Continue to focus on creating quality content and getting your name out there via social media and networking.
Intermittent Blogging – When there are long “silent periods” between blog posts, it is difficult to build a solid following. People looking for information on your topic usually want a steady stream of new information to keep them interested. When a blog fails to deliver fresh and updated content people get bored and look elsewhere.
Poor Content– Some bloggers think they can beat the system with auto-generated content or with duplicate content that is reworded. Readers know fluff when they read it. They know when an article has absolutely no value or when it is simply clickbait. A blog with poor content will never be successful.
Too Many Ads – Blogs with dozens of ads obscuring most of the content will deter visitors from returning. People don’t come to your blog to be visually harassed by ill-placed, blinking advertisements. They come for information. While ads are a great way to monetize, don’t overdo it.